
Making a Crokinole Board
The Desire
If you follow the internet gaming discussion groups (the rec.games.board newsgroup or either the SpielFrieks or Unity Games Yahoo groups) you may know that there is a group of gamers who will tell you that Crokinole is one of the best parlor/dexterity games around. As I read more about the game, I became intrigued with the game. One of my favorite dexterity games is Carabande and Crokinole is another "finger-flicking" game so I thought I might like it. I looked around and no one I could find here in central Texas had a board or knew much about the game as the game seems to be played mainly in the northeast and Canada. (Although it seems to be spreading to California too.)I wanted to try the game but since there were no stores around here with one I thought I would just get a board from one of the internet based stores that sell them. After checking out places like Mr. Crokinole and Glenn Kuntz's The Crokinole Board I found some really nice boards but for prices I was unwilling to pay without ever having tried the game. That's when the woodworker in me said, "I can make one of those." So, I did.
Planning
I started with looking for plans. I found several places (see the resources listed at the end) and decided to get the Make-It-Yourself kit from Mr. Crokinole, item P30. This set came with the plans, 24 discs and the pegs needed to make a board plus a rules sheet. Seemed like just the ticket.Once I had the plans I dug through my scrap wood pile to see what I had. Turns out I had a nice piece of 1/4" birch plywood I could use for the playing surface but didn't have a big enough piece for 3/4" to use as the base, so it was off to the lumber store. I decided to go with oak for the base and rails since I thought it would contrast the birch playing surface. I didn't go for a more exotic wood to keep the cost down since this was experiment.
Construction
There really aren't that many pieces that go into the construction of the board. For the base, there is a octagonal piece of 3/4" plywood with a hardwood border to provide a lip. The playing surface is a large circle with a hole in the middle. Add a few screws with rubber hose on them and you have all of parts. Even with just these few parts, it's not a simple woodwoorking project, but one that someone with a decent amount of woodworking experience should have no problem completing.For the base I used 3/4" oak plywood. The plans called for the base to be 26" across, unfortunately, my table saw can only cut a 24" width, so I had to hand cut the base with a circular saw and straight edge. I knocked the corners off to form the octogon on the table saw. For the rails I used solid oak, planed down to 3/8" thick. I cut the rails to size and fitted them to the sides of the base. Not wanting to have nail or screw holes showing, I attached the rails to the base using a biscuit joiner.
The playing surface was the most important piece and probably the trickiest. I had never had to cut a perfect circle before for a woodworking project. After some investigation, it seems that the two most popular ways are with a band saw or a router. In either case, you need some type of jig to help make the circle. In the end I decided to use my band saw.
After some playing around and trying out a couple of ideas, I was able to construct a table extension/circle cutting jig. (To make it secure, I had to drill a couple holes in the case of my band saw for some bolts.) The plans for the playing surface called for a 23 1/2" diameter board. This worked out really well as I had a 2' by 4' piece of 1/4" birch. This allowed me to make two playing surfaces and use which ever one came out the best. After about a hour of jig making and set up, I was able to cut two perfect circles in about 5 minutes, definitely worth the preparation time.
Next came lots on sanding and two coats of polyurathane on the playing surface. With the second coat of poly dry and sanded smooth, probably the hardest part of the project came up, drawing the lines on the board. Well, maybe not the hardest, but certainly the one thing that would show up the most if I messed it up. (Note: I did the two coats of poly to keep the marker I used to draw the lines from bleeding into the wood. This worked well.)
To draw the lines, I took a scrap piece of wood about 1/2" wide, 1/8" thick and 14" inches long. I drilled a small hole near one end for a 4d finish nail and three slightly larger holes spaced out in the correct locations to draw the three main circles for the board. Here's where I was glad that I had made two surfaces. When I draw the circles for the first board, the marker I used (a black "Sharpie" permanent marker) bleed in to the guide slightly. This caused a couple of the circles to have a extra small line next to the main line. Not real bad, but fairly noticeable. With that experience and a few minor adjustments to the guide, I was able to draw three nearly perfect circles on the second board.
With the circles done, it was fairly easy to layout the quadrant lines with a straight edge and framing square. I also took this time to mark the locations for the screws that make up the posts on the edge of the 15 point circle. The last major work on the playing surface was drilling the 20 point hole. A 1 1/4" Forstner bit took care of that job in short order.
Final construction was just around the corner. I stained the base a medium brown to contrast the natural color of the birch playing surface. The playing surface was then centered and glued to the base using standard wood glue. (Have plenty of clamps ready for this step. I needed eight, one on each side.)
Finishing consisted of two coats of polyurathane on the base and one more on the playing surface (to protect the marker lines). I then put three coats of wax on the playing surface to make it slick. Pilot holes for the screw pegs and the pegs themselves were added and the board was done.
The Results
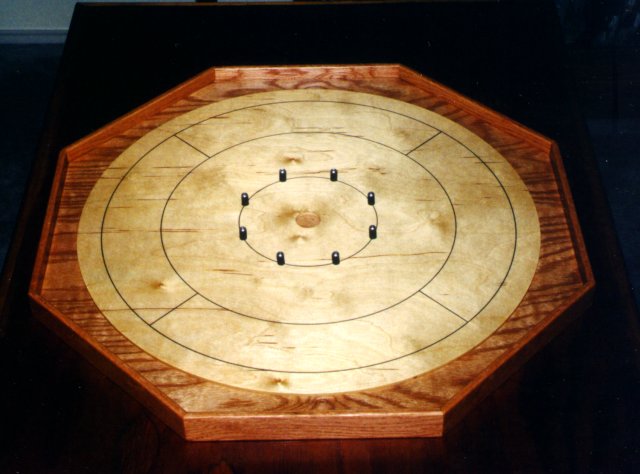
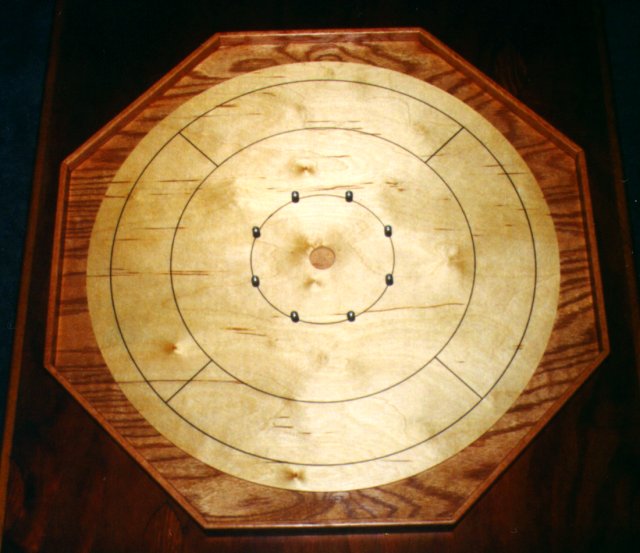
How did it turn out? I'm pretty happy with the results. I'm not sure how mine stacks up against the boards you get from one of the internet shops since I have nothing to compare it with. I would still like to find someone local who has a board and compare. So if you live near Austin and have a board, contact me and we'll compare.Here are a couple pictures of the finished board. Click on the pictures to get a larger version.
|
The finished board |
|
Top down view |
Playing on the Board
After getting a feel for the game and playing around just shooting the discs, my wife and played a few games the first week after I had finished the board. I certainly like the game (of course I may be jaded after spending so much time making the board). My wife thinks it's cute, but nothing to go ape over. I had assumed this might be the case as I like Carabande and she doesn't like it as much.The kids though, are having great fun with it. I have played my 8 year old several games. He was a little discouraged at first, losing his first couple of games, but he soon got the feel for the game and did beat me. He even tries to get his friends to play when they come over. My 5 year old has fun just shooting the discs, which is fine with me.
I have left the board out for our weekly game nights. Just about everyone who has come over has tried the game. Most seem to enjoy the game and it appears to be growing on them. It usually gets played when people first show up or as a filler in between games.
What I Would Do Different
Most woodworking projects provide the opportunity to learn something new and looking back you usually think you could have done something better. In this case, the things I would do different are:- For drawing the circles, I would use a non-wooden guide. Something that would not soak up the ink and possibly leave additional marks. Probably plastic or plexiglass would work.
- Instead of a octagonal base, I might try a round one. It's not that the octagonal board is bad, it's just that the round base would provide the new challenge of bending the rail around the base.
- Finishing: I would like to experiment with different ways to finish the playing surface. The goal is to get the smoothest and fastest surface possible.
Summary
Was it worth it?You bet!
Was it more cost effective?
That's a tougher one to answer.
Materials wise, the board cost about $50.
If you factor in the time cost at a minimal rate, it would probably double or triple the cost
which would bring it more in-line with the cost of a board mail-order.
In any case, it was certainly a fun project. It's not too often you get to merge your two favorite hobbies. I actually hope that I can get someone else in our game group hooked on the game so I have an excuse to make another board.
Crokinole Resources
- Mr. Crokinole - Boards, plans, parts, information
- Glenn Kuntz's The Crokinole Board - Boards, discs, information Note: Seems to be dead
- Crokinole and CarromCarl and Stan Hilinski's crokinole and carrom web page
- Crokinole Boards by Willard - Family run maker of high quality boards
- Miracle Ventures - Canadian based crokinole vendor
- Creative Wood Products Boards and pieces
- Workshop Supply - Board plans
- The Board Room show on Crokinole - Featuring Glenn Kuntz
This page viewed
E-mail Ed Rozmiarek with questions or problems concerning this page.
Copyright © 2001, Ed Rozmiarek